+86 15093323284 hams@ailunce.com


How to Add a New Analog Channel without Computer on Ailunce HD1?

We know the Ailunce HD1 is a FPP amateur radio. It is dual band DMR radio. When we outside, there is no computer at hand.
How to Add a New Analog Channel without Computer on Ailunce HD1?
Today we will show the detailed steps.
Step 1: Make sure your radio current band is in VFO mode.
Make sure you radio current band is in VFO mode. If not, please short press the "EXIT" key to switch.

Step 2: Make sure your radio current band is FM mode.
Make sure your radio the current band is FM mode, If not, please long press the “EXIT” key to switch.
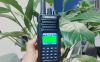
Step 3: Write the receive frequency via the radio keypad directly.
We know that the radio display frequency is the current receive frequency. So here we can write the receive frequency directly. For example, here we write 435.23500Mhz.

Step 4: Press “Menu”, select the “Band A set” to get into the setting.
Step: If we can’t write some frequency directly, we can adjust the step.

Power: We can set the current channel power. High/Middle/Low

Vox: Turn on or off.

Vox Level: we can set different vox levels.

W/N: Here we can set the wide band or narrow band.

TOT: Set the current channel tot.

C-CDC: One step to set the same receive and transmit ctcss or dcs.
Note: Once you set it, the R-CDC and T-CDC will be set simultaneously by default.
R-CDC: Receive ctcss or dcs
T-CDC: Transmit ctcss or dcs

Busy Lock: We can set the transmit.

Shift Up: this is the offset direction. If we need to connect the repeater, and there is offset value, we can set the direction. If we only want to achieve simplex communicate, the receive and transmit frequency are same, keep the shift up “OFF”.

Shif Freq: Here we can set the offset.

Other lists in “the Band A” set we don’t need to set in analog mode.
Step 5: Exit the “Band A Set”, get into “Main Set”.

Step 6: Find the “Save CH”, get into “Save Channel”.

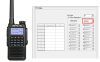
Step 7: Edit Save Channel
In the “Save CH”, we can find there are two channel displays, CH-xxxx and xxxx. CH-xxxx indicates the current channel is occupied, If we save the VFO to this channel, It will override the previous channel Settings. xxxx indicates the current channel is empty, we can save a new channel in this channel.

Here we can select 0014, press “MENU” to confirm. Then we can write the channel name.

and check save. Here I write the channel name “Test”.

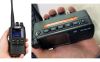
Now we have add the new channel successfully.
Go to home page, and check the channel we have added.

Hope this article is useful to you. Any questions, feel free to leave messages to us.


I am new to ham radio and I need those same step by step instructions on how to access a repeater
Yolanda Author
You can check the blogs on the ailunce website. If there are any unclear for you. you can contact us via chat on the website, or our fb message. we will show you step by step directly.